When it comes to gift giving, I LOVE to make the gifts, if I can.
Giving gifts, for me, is one way I can show the person that I have been paying attention to the things they like.
I'm all about making/buying gifts that are unique to that one person.
You would not believe the impact just one thoughtful gift can have on a person.
It makes them feel treasured.
I like being able to demonstrate my love for this person in this fun way.
SO, about a month ago, I found myself trying to come up with an idea for my good friend Jennifer's birthday present. To sum her up in one word...
Plus, she is graduating in December & will have a new place so I thought the perfect gift would be some wall art to decorate those bare walls!!
I happened to find the perfect gift to make.
Giving gifts, for me, is one way I can show the person that I have been paying attention to the things they like.
I'm all about making/buying gifts that are unique to that one person.
You would not believe the impact just one thoughtful gift can have on a person.
It makes them feel treasured.
I like being able to demonstrate my love for this person in this fun way.
SO, about a month ago, I found myself trying to come up with an idea for my good friend Jennifer's birthday present. To sum her up in one word...
ECLECTIC.
music.to.my.ears.
Plus, she is graduating in December & will have a new place so I thought the perfect gift would be some wall art to decorate those bare walls!!
I happened to find the perfect gift to make.
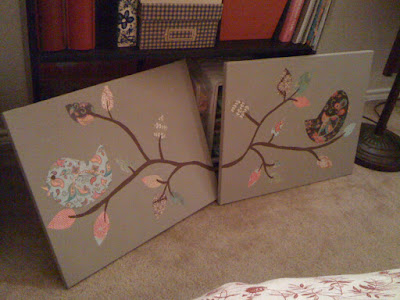
Isn't it beautiful?
You won't believe how stinkin' easy this was!
Before, I begin this fun tutorial for you guys I want to give complete credit to Ashley Ann whose blog is seriously wonderful & full of more DIYs that look like so much fun.
SO, LET'S BEGIN!!
Here is what you will need:
Canvas
[any size works]
Paint
Paint
Scrapbook paper
[find your favorite prints, mix n' match]
Since the birds were the focal point of the wall art, I tried to find two contrasting patterns like these first:
I chose my other patterns to accent the the main colors of the two above to really pull everything together.
{I got everything at Hobby Lobby for under $20, minus the Mod Podge that I already had..it's so handy!}
Step 1:
If you are painting the canvas, go ahead and paint a few coats to the shade of your hearts desire.
Step 2:
While your canvas is drying, cut your random scrapbook paper for your leaves.
[You can either free hand this or draw the leaf shape on the wrong side of the paper and then cut]
Step 3:
Before I glued down my leaves, I laid them out on the canvas in the positions I wanted so I could play around with them until they were just right.
Step 4:
After you have figured out the exact position for your leaves, draw (with pencil) the branches to connect everything together.
Step 5:
Glue down the paper. I applied Mod Podge to the back of the paper and then stick them on the canvas.
[Make sure you do a thin layer on the back so they won't bubble.]
After I glued them down, I went back over the top & edges of the paper and applied another thin layer of Mod Podge.
Step 6:
Once the Mod Podge dries, you can paint your branches. Easy breezy!
Just like this....
(i painted my branches a little bit thicker than i wanted, but it still came together..so don't stress out if you mess up, it will just make it more unique!)
For the birds, I initially tried to free hand them, but seeing as how God did not give me the gift to draw, I just blew up the original photo of the DIY, cut out the birds, and traced them on the backside of the two patterns. I glued them down the same way that I did the leaves.
SIDE NOTE:
the Mod Podge dries clear, however, when it did dry, it left the surrounding edges of all the leaves and birds a little darker shade than the entire canvas. In order to fix this just repaint the canvas to get it to it's new darker shade.
Here is my finished product:
It was so exciting to give these to her & see her reaction. I honestly wasn't sure if I liked them as much as the original, but she LOVED them.
Now they have found a new home here in Jenn's room until she finally gets her new place!
I can't wait to see their new home after graduation!
P.S. All of these pictures were courtesy of the beloved iPhone. As much as I love this phone, I do not love how the pictures look. I promise next DIY will be with a much better camera!
Hope you enjoyed my first tutorial!
Have a great Wednesday!
Love, Tina.


